Teaching Mallet Percussion in Band Class: A Carefully Planned Program + Appropriate Testing = Success

Keep the music stand low and close to the bars when reading on a mallet percussion instrument.
If you’re teaching mallet percussion in high school and have never attempted to sight read music on a mallet instrument, walk over to a xylophone, marimba, glockenspiel or vibraphone right now and try it. Even pianists will be surprised at how difficult it is.
With your eyes focused on the music, you can barely see the keyboard. Unlike any other instrument, fingers have no contact with keys or a fingerboard; with a slight twist of the wrist, or a stroke that’s not straight up and down, you’ll be hard pressed not to hit wrong notes.
To guide your high school percussionist students to better sight reading on mallet percussion, introduce them to the 6 points listed below and be sure to provide them with the opportunity to play the instruments regularly in class.
And when it comes to testing, assign material that is challenging – while keeping in mind how easy it is to assign a test that’s way beyond a student’s level.
Testing Mallet Percussion
In The Band Teacher’s Percussion Guide, I point out how percussion/mallet students are often assigned tests that don’t challenge them. With no worries about their embouchure, breath control or fingerings, and with no real technical demands, they can easily memorize a few notes that the rest of the class is assigned and ace a test with little or no effort. This is often the kind of test they are assigned from the method book in the first weeks and months of playing.
However, the reverse is also true. We’ve seen that it is notoriously difficult to read on mallet instruments, and as the class learns more notes, the mallet tests may become a disproportionately greater challenge for percussionists who don’t play xylophone, marimba, bells or vibraphone on a regular basis. Keep in mind too that percussionists who mostly play untuned percussion in class usually struggle just to recognize notes on a staff. As they did when they first started band classes, they resort to memorizing their tests. As tests get longer and more complex, what may not appear difficult to the teacher often becomes an exercise in agony for the student.
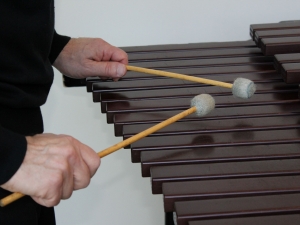
Hands are held low, thumbs are at the sides of the mallets and the head of the left-hand mallet is ahead of that of the right-hand mallet.
But even when high school percussion students succeed in memorizing the test – and get a good mark to boot – have they necessarily learned much about playing the instrument? Probably not. They’ve painstakingly memorized notes, but they still can’t sight read, and haven’t learned to recognize the notes on the staff. They may hit the right notes, but are they using a logical sticking – one that would serve them well if they had to play at a quicker tempo? Are they playing with a relaxed technique, getting an even sound from the right and left hand mallets, and a full sound from the instrument?
Tests must incorporate musical and technical materials that have been introduced in class, materials that students have had a reasonable amount of time to practise and absorb. A test that is too difficult – or too easy – does not teach students much about playing the instrument. Students achieve success when they play mallet instruments regularly, and when tests are challenging and appropriate.
6 Points to Remember
When planning your program, consider the following points:
- Make sure your students devote some time in every class playing mallet instruments.
- Since mallet instruments are generally not portable, schedule time at lunch, before or after school when students can come to the classroom or a practise room to practise. (Ditto for timpani).
- * Teach your students a functional grip and stroke: 1) Hands are flat with thumbs at the side. 2) The stroke moves straight up and down. 3) The head of the left-hand mallet is placed ahead of that of the right-hand mallet.
- * Show them how to approach sight reading on mallet instruments: 1) Keep the music stand low and in the centre of the range of notes in the part. 2) Keep eyes on the music, using peripheral vision to gauge where the notes are on the keyboard.
- * Show high school percussion students where to strike the bars: 1) Strike toward the centre of the bar. Striking the section below the node (where the string runs through the bar) on the “black” keys is acceptable when playing quicker passages.
- If possible, have a set of bells available for students to take home. (Note: bells are not a great instrument to practise on. The ringing can be annoying – especially when practising quick passages – and the bars are small. However, they are better than nothing and are a useful tool to help learn sight reading.)
* For further information, watch Stewart’s video: Teaching Mallet Percussion
Explore The Band Teacher’s Percussion Guide: Insights into Playing and Teaching Percussion (Oxford University Press)
thnaks for the information