Band Teacher’s Percussion Guide author Stewart Hoffman on playing & teaching percussion, drums and vibes. Packed with info for high school band teachers.

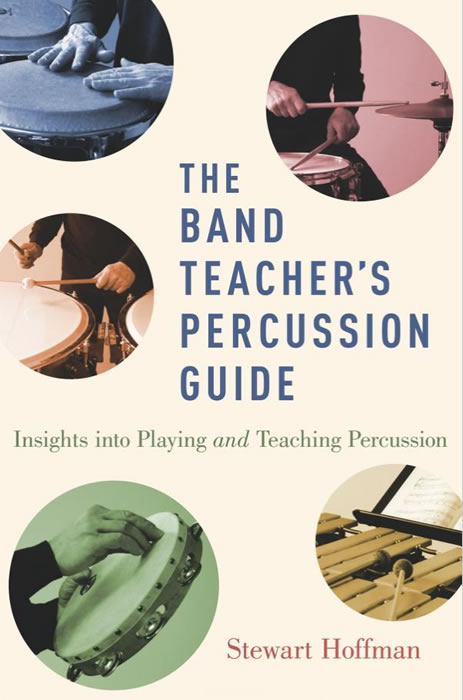
Stewart Hoffman is the author of The Band Teacher’s Percussion Guide from Oxford University Press

(Watch all the videos related to this post: Teaching Lifts and Levels; Teaching and Playing Paradiddles; and Practising Paradiddles)

No matter what a drummer’s goal is – whether it’s to play in an orchestra, or a jazz, rock or marching band – playing paradiddles well is fundamental to his or her musical development.

Screenshot from video Practising Paradiddles

Watch Practising Paradiddles, then send the link to your students for an effective, guided paradiddle practise session in real time.

What is a Paradiddle?

The paradiddle is an essential rudiment that’s often introduced early on in a school percussion program, so you’ll want to watch carefully that your students are playing paradiddles right.

It consists of four, equally spaced notes, starting with two single strokes followed by a double stroke, or “diddle”. The first note of the four is usually, but not always, played with an accent.

So if we’re starting on the right hand, the accented first note is followed by a second note on the left hand, which is then followed by the final two notes played on the right hand. That final  “diddle” sets up the following paradiddle to start on the opposite hand. Now starting on the left hand, the pattern is L-R-L-L, and so on.

In this introduction to playing paradiddles, we’re going to focus on two important elements:

  • the accented note played at the beginning of each paradiddle
  • and the double strokes – the final 2 note “diddle

The one thing we always keep in mind – the underlying concept that informs whatever we play – is that we play as efficiently and tension-free as possible.

To control accents and dynamics in general, and to help students play with a relaxed stroke, I teach a system called Lifts and Levels (watch the video here), which I incorporate into the teaching of paradiddles.

Playing the accent

The first thing to consider when playing paradiddles is how to play that accented first note.

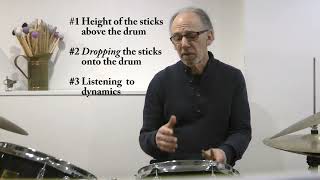
Keep in mind that to play louder on a drum, we simply drop the stick from a higher level – as opposed to pushing or beating down harder onto the instrument. So we’re going to drop that accented first note from a higher level than the subsequent three, unaccented notes.

What drummers have to consider is that when a stick falls or is dropped onto a drum, it creates kind of a minor explosion, and if it’s dropped from a higher level, that explosion is going to have more energy. And you don’t have to “hammer” it down to get a solid rebound; just by dropping it, or gently tossing it onto the head when playing quicker passages, the stick bounces back. The challenge for percussionists is to learn to control, direct – and sometimes tame – that burst of energy off the drum.

Stiffening up and hammering that first, accented note into the drum, results in a loss of control. The stick bounces back, but a tense hand and arm won’t respond smoothly to that sudden burst of energy kicking back off the head, and won’t be able to efficiently manage the direction the stick takes. The drummer must lift the stick smoothly off the drum, in synch with that rebound.

The ability to control that rebound is fundamental to a good technique.

Playing paradiddles with “lifts and levels”

(View the video Teaching and Playing Paradiddles with Lifts and Levels here)

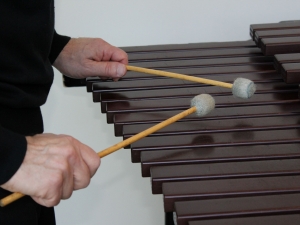
To start playing paradiddles, we’re going to incorporate 2 levels at roughly 12” and 2” above the snare drum: a 12″ level for the accented note and a 2″ level for the unaccented notes. (You can incorporate more levels, but for now, we’ll keep it to two.)

Starting with a right hand paradiddle, we set the right hand at 12” and the left hand at 2”.

For the first note, we drop the right hand from 12” and end the stroke at 2”.

For the second note, we drop the left hand from 2” and end at 12”.

And for the third and fourth notes, we drop the right hand from 2″ and end at 2”.

And now, we’re set up to play the paradiddle starting from the left hand.

At first, you or your students should play each stroke slowly and very deliberately, focusing on:

  • Dropping, not pushing or hammering the stick into the drum. Think simply about releasing the weight of the drumstick, hand and forearm. We’re focusing on staying relaxed and thinking about weight and gravity to guide the stroke.)
  • Again, review the video on lifts and levels. Don’t let the fingers flare out. Keep the 3rd and 4th fingers relaxed and curved under the stick to keep it under control when it strikes the drum. Don’t grab the stick when it hits the drum. With a tension-free hand stopping at the 2” position, and the curved and relaxed fingers remaining in position, the stick will pop back and stay in place.

Playing the “diddles”

After lots of (hopefully) slow, thoughtful practice, students will become more comfortable with the levels, and a tension-free, dropped stroke. The speed will come over time. But as the paradiddles get faster, we have to focus on keeping the diddles even by not allowing an uncontrolled bounce on that 2nd note of the diddle.

Students shouldn’t play a diddle – or double-stroke, for that matter, when playing an open roll (watch Teaching Double Strokes here) – by pushing the stick into the drum with a stiff arm and expecting to get 2 even notes. With that approach, you get a loud note, followed by a quieter note that isn’t necessarily rhythmically accurate. After an initial, relaxed drop onto the drum, that second stroke should be supported and controlled by a second, but smaller, wrist stroke. Smaller because that first stroke is going to rebound with so much energy that all you have to do is harness it and, with a gentle turn of the wrist, redirect the stick back toward the drum.

When playing paradiddles, it’s important to drop the notes from different levels – lower accents and higher unaccented notes – while still keeping clearly differentiated levels. Using smaller motions is a great way to develop control.

Keep in mind too, that students must always listen carefully to the sounds they’re creating. And teachers, make sure your students know what to LISTEN for:

  • an even, 4-note pattern, with the accent and diddles sounding EXACTLY the same no matter WHICH hand the paradiddle begins on.

I encourage you to check out my Practising Paradiddles video, send the link to your students, and have them join me for a practise session in real time. The video will keep them engaged and focused as I guide them and provide a clear model for practising paradiddles.

What are Drum Fills?

Drum fills are short, improvised drum, or drum and cymbal patterns, most often played when moving into a different section of a tune – as when a verse leads into the chorus, to name just one example.

Drum fills commonly take up anywhere from the last beat of the bar to the full bar leading into a new section of music (though they could be longer). They often end with a cymbal note on the downbeat of the first bar of the new section. I say cymbal “note” rather than “crash” because that “note” can be played as a gentle colour or a minor explosion – or anything in between – depending on the context of the music*.  Fills can be rhythmically complex, but they are often simple statements. However, the goal is always to serve the music, to move it forward without drawing attention away from it.

*Note that when a fill ends on a floor tom note, it is easier – especially at quicker tempos – to play the downbeat cymbal note on the ride cymbal rather than a crash cymbal usually placed to the left of the drum set.

Challenges Playing Drum Fills

Students often have difficulty placing the drum fill accurately within the bar. For example, the two-beat drum fill that starts off on beat three might mistakenly extend well beyond the downbeat of the following bar.

To help students internalize the timing and execution of fills, we’re going to start off practising the placement of 2-beat drum fills.

The Music Download

In the PLAYING TWO-BEAT FILLS DOWNLOAD, you’ll find two, 2-bar exercises consisting of “Basic Rhythm #1” and “Basic Rhythm #2”.

Each Basic Rhythm is a fill written over the last two beats of the second bar. However, we’re going to build on that rhythm, and give it further interest by orchestrating it over the other drums. The subsequent orchestrations “b”, “c”, “d” and “e” – played among the snare and 2 or 3 toms – are only four of many possible orchestrations of that original, snare drum rhythm.

By playing and creating orchestrations in this manner, students will explore and internalize ways of getting around the drum set while solidifying their time feel.

On page 3, you’ll find 6 more “basic rhythms” with which students can create their own orchestrations.

Students can watch all of THE ORCHESTRATIONS ON VIDEO HERE, and practise them along with me.

Of course, there are endless possibilities when it comes to playing drum fills, and students should expand on the ideas presented here to explore fills of different note values – such as eighth-note or sixteenth-note triplets, 32nd notes, etc., as well as combinations of those note values, and fills of longer and shorter duration.

Explore The Band Teacher’s Percussion Guide: Insights into Playing and Teaching Percussion (Oxford University Press)

Play with 4 mallets at the vibraphone

Keep the music stand low and close to the bars when reading on a mallet percussion instrument.

If you’re teaching mallet percussion in high school and have never attempted to sight read music on a mallet instrument, walk over to a xylophone, marimba, glockenspiel or vibraphone right now and try it. Even pianists will be surprised at how difficult it is.

With your eyes focused on the music, you can barely see the keyboard. Unlike any other instrument, fingers have no contact with keys or a fingerboard; with a slight twist of the wrist, or a stroke that’s not straight up and down, you’ll be hard pressed not to hit wrong notes.

To guide your high school percussionist students to better sight reading on mallet percussion, introduce them to the 6 points listed below and be sure to provide them with the opportunity to play the instruments regularly in class.

And when it comes to testing, assign material that is challenging – while keeping in mind how easy it is to assign a test that’s way beyond a student’s level.

Testing Mallet Percussion

In The Band Teacher’s Percussion Guide, I point out how percussion/mallet students are often assigned tests that don’t challenge them. With no worries about their embouchure, breath control or fingerings, and with no real technical demands, they can easily memorize a few notes that the rest of the class is assigned and ace a test with little or no effort. This is often the kind of test they are assigned from the method book in the first weeks and months of playing.

However, the reverse is also true. We’ve seen that it is notoriously difficult to read on mallet instruments, and as the class learns more notes, the mallet tests may become a disproportionately greater challenge for percussionists who don’t play xylophone, marimba, bells or vibraphone on a regular basis. Keep in mind too that percussionists who mostly play untuned percussion in class usually struggle just to recognize notes on a staff. As they did when they first started band classes, they resort to memorizing their tests. As tests get longer and more complex, what may not appear difficult to the teacher often becomes an exercise in agony for the student.

Hand and mallet position when playing the xylophone.

Hands are held low, thumbs are at the sides of the mallets and the head of the left-hand mallet is ahead of that of the right-hand mallet.

But even when high school percussion students succeed in memorizing the test – and get a good mark to boot – have they necessarily learned much about playing the instrument? Probably not. They’ve painstakingly memorized notes, but they still can’t sight read, and haven’t learned to recognize the notes on the staff. They may hit the right notes, but are they using a logical sticking – one that would serve them well if they had to play at a quicker tempo? Are they playing with a relaxed technique, getting an even sound from the right and left hand mallets, and a full sound from the instrument?

Tests must incorporate musical and technical materials that have been introduced in class, materials that students have had a reasonable amount of time to practise and absorb. A test that is too difficult – or too easy – does not teach students much about playing the instrument. Students achieve success when they play mallet instruments regularly, and when tests are challenging and appropriate.

6 Points to Remember

When planning your program, consider the following points:

  • Make sure your students devote some time in every class playing mallet instruments.
  • Since mallet instruments are generally not portable, schedule time at lunch, before or after school when students can come to the classroom or a practise room to practise. (Ditto for timpani).
  • * Teach your students a functional grip and stroke: 1) Hands are flat with thumbs at the side.   2) The stroke moves straight up and down.   3) The head of the left-hand mallet is placed ahead of that of the right-hand mallet.
  • * Show them how to approach sight reading on mallet instruments: 1) Keep the music stand low and in the centre of the range of notes in the part.   2)  Keep eyes on the music, using peripheral vision to gauge where the notes are on the keyboard.
  • * Show high school percussion students where to strike the bars: 1) Strike toward the centre of the bar. Striking the section below the node (where the string runs through the bar) on the “black” keys is acceptable when playing quicker passages.
  • If possible, have a set of bells available for students to take home. (Note: bells are not a great instrument to practise on. The ringing can be annoying – especially when practising quick passages – and the bars are small. However, they are better than nothing and are a useful tool to help learn sight reading.)

* For further information, watch Stewart’s video: Teaching Mallet Percussion

  Explore The Band Teacher’s Percussion Guide: Insights into Playing and Teaching Percussion (Oxford University Press) 


Stewart Hoffman at his 2017 NYSSMA workshop on snare drum technique

Stewart Hoffman discusses the buzz roll at his NYSSMA Convention 2017 workshop presentation.

A good buzz roll should sound even, seamless, and remain under control at all dynamic levels. The best drummers devote a great deal of their practise time focusing on it.

In Playing and Teaching the Buzz Roll – a short video excerpt from my NYSSMA (New York State School Music Association) Winter Convention snare drum clinic in Rochester, NY – band teachers will gain insights, and discover a couple of great exercises, to help guide their percussionists to a solid and seamless roll.

View Playing and Teaching the Buzz Roll here.

The development of good percussion technique is not often on the teacher’s or student’s mind during those first weeks or even months of classes.

The wrists should be close to the drum, flat and with the thumbs at the side.

After all, there’s nothing easier than playing a note on a snare drum, xylophone or timpani: any beginner can hold a stick or mallet above a drum head or bar, let it drop and – bam! – there it is. And with snare drum and xylophone, you don’t even have to worry about pitch or intonation!

Compare that with what the other beginning band students must learn – how to form good embouchures, proper breathing, fingerings – and its no wonder that, after a lesson on holding the sticks, percussionists are often left largely on their own for the first few weeks of classes while the other instrumentalists demand all the attention.

But, like everyone else, percussion students should focus on developing a good percussion technique from day one. If they don’t, they are far more likely to develop bad playing habits and tense, uncontrolled playing – which will cost them dearly later on when they have to play rolls, other rudiments, and more demanding music in general. And there is nothing more difficult than having to change a student’s playing once bad habits have been ingrained.

So once you’ve introduced your percussion students to a good grip, hand out the points listed below – then relentlessly remind them to follow them. Indeed, those first weeks of classes, when they are expected to play nothing more than single strokes, are an ideal time to have them focus on and absorb the points below, which apply to all percussion instruments no matter what specific grip is used.

(In The Band Teacher’s Percussion Guide: Insights into Playing and Teaching Percussion, I advocate and explain the teaching of matched grip for snare drummers– though students who exhibit good control playing with traditional grip need not change.)

So keep your students focused on developing a good percussion technique by frequently reminding them to follow the points below. Once these points are internalized, your students will play with less tension, greater control and fluidity and, ultimately, perform more musically in your band or orchestra.

8 Points for Percussionists to Focus On:

  1. Relax all the muscles as much as possible from the shoulder, down through the arm and into hand. Tense playing will reduce speed and may result in injury.
  1. Hold the stick or mallet firmly but not tightly. Squeezing the stick or mallet too tightly will create tension all the way up the arm.
  1. The hands and wrists should be held very close to the drum or mallet instrument. The vast majority of playing is done with the wrists about an inch or two above the rim of the drum or the keys of the xylophone (see photo above).
  1. Keep the wrists fairly flat, with the thumbs at the side of the stick. Playing with the thumbs on top of the sticks may result in a circular stick motion. (Some techniques that incorporate greater finger control may advocate a “thumbs up” position.)
  1. Do not strike the instrument from an angle. Doing so leads to playing with circular strokes, which is inefficient.
  1. Create an “arc” shape when lifting and dropping the stick onto the instrument. The stick should not fall from a position parallel to the instrument.
  1. Play louder or softer notes by dropping the stick from a higher or lower level. Don’t hammer harder into the instrument to play at a greater volume.
  1. Play passages evenly by lifting and dropping the stick to and from the same level above the drum or keyboard.

Keeping these points in mind – and at the top of your students’ minds – will help guide them to a relaxed technique that will serve them well for a lifetime.

As always, I welcome your comments – along with any points you would like to see added to the list.

(DOWNLOAD Snare Drum Sticking Patterns here)

It’s not easy to engage and challenge percussion students in school band class. Just having them play the method book snare drum part – especially during those first months of classes – won’t do it. Having them work on the snare and mallet exercises in a method book helps a little but, compared to the other instrumentalists in the class, there’s still not much for them to do. Dropping a stick onto a drum to play a quarter note doesn’t challenge percussion students (consider what a trumpeter has to learn just to play a note!). Playing nothing more than quarter notes and half notes for 20 or so lessons doesn’t lead to percussion students being engaged and happy. Not to mention that they just don’t learn much in the process.

But there are things band directors can do to spark their interest, and develop their technique and musicality. In my book, The Band Teacher’s Percussion Guide: Insights into Playing and Teaching Percussion (Oxford University Press), I discuss a number of possibilities. I’ll point out a couple here, and add some snare drum sticking patterns that will help engage and challenge percussion students as well as improve their technique.

Relentlessly watch your percussion student’s technique

First of all, beginning concert band class provides a great opportunity to relentlessly keep an eye on your percussionists’ technique. It’s easy just allow them to bang out notes while ignoring how they are playing the drum. If you can get your percussion students to focus on playing with good form and a relaxed stroke now – when they are forced to play slowly – they will be better prepared for technical challenges that come later on.

Play method book exercises on instruments other than snare drum

Secondly, try having them play the exercises on instruments other than the snare drum. They will start thinking about the different sounds they can produce and how best to produce them. Playing on instruments that sustain sounds, like cymbals, will help them understand the true length of the quarter and half notes that are notated.

Have students:

  • play the snare parts in the method book on tambourine, triangle, bass drum or suspended or crash cymbals. If the instrument rings, teach them how to dampen so that it sustains for the correct time value.
  • play on two tom toms. Using alternate sticking, they can play each bar moving between tom toms, or; they can play one bar with the right hand only and the following bar with the left, or; they can play the right hand on one tom and the left hand on the other.

Zero-in on rudiments and rolls

Percussionists must focus on new rudiments, buzzes and rolls as they are introduced in the method book. It’s just not enough that they are played once or twice at a slow tempo in the course of a band exercise. To challenge percussion students and guide them toward a more solid technique, make sure they practise buzzing and buzz exercises, rolls and rudiments on their own. They should practise them very slowly at first, but more and more quickly over months – and even years – always focusing on playing evenly and with a relaxed technique. Assign rudiments and rolls with appropriately challenging metronome marks as goals. Include them as a component of their play tests.

Try Practise and Warmup Snare Drum Sticking Patterns (download here)

You’ll need to supplement the method book with other material too.

You will find lots of basic flam, paradiddle and buzz exercises that can be downloaded for your students at the Percussion Guide’s Companion Website, but you can also try  these Practise and Warmup Snare Drum Sticking Patterns, which I’ve based on George Lawrence Stone’s Stick Control, a classic book for developing snare drum technique. Students should play the quarter, eighth or sixteenth note exercises (depending on their technical level) in place of the snare drum material written in whatever method book exercise you are playing with the rest of the band. Playing these exercises evenly and without any accents will help your percussionists develop concentration, a good sense of time, and the ability to place notes right with the beat.

Playing from the method book alone does not challenge percussion students in a school band program. By adding a few of the suggestions and exercises above to the daily routine, you will help do so.  At the same time, you’ll guide them to a stronger technique and better musicianship.

Summer is winding down and if you’re a high school band teacher, you’ve likely begun to tidy your band room, organize instruments, search out new music and plan programs.

But have you taken the time to focus specifically on your high school percussion program? Have you considered whether all your percussionists will be required to play snare drum, mallet instruments and timpani? Have you thought about expectations and outcomes, chosen music and considered tests that will develop your percussionists’ musicianship on each of the instruments? Maybe you’re considering having some students play untuned percussion and leaving mallets and/or timpani to someone with piano background?

To provide your students with an enjoyable, valuable and rewarding musical experience, preparing a well-considered plan, clearly communicating it to your percussionists, then developing a schedule that best facilitates your plan, is a must.

What instruments will the percussionists play?

It seems obvious that teachers should decide what instruments percussionists will have to play, but sometimes expectations are not so clear.

If all high school percussionists play all the instruments – an arrangement that I favour and one that obviously produces a well-rounded percussionist – they should be able to warm up and play at least an exercise or two on snare drum, a mallet instrument and timpani during most classes.

If you decide that pianists will play mallet instruments and/or timpani, I recommend that those playing untuned percussion achieve a working knowledge of mallet instruments in particular. Students who don’t have a relationship with a melodic instrument will have more difficulty relating to and understanding musical theory. And who knows, students who are eased in to playing mallet instruments or timpani may find that these otherwise foreign instruments are as engaging as the drums that first lured them to the percussion section.

Don’t neglect to organize a schedule, usually during recess or lunch time, so that students can practise mallets and timpani in the music room . (Practising at home on a portable glockenspiel is better than nothing, but given the tiny bars and excessive ringing, it’s not the most satisfying instrument to practise on.)

What should students practise in a high school percussion program?

For percussionists to develop a solid technical foundation, plan to go beyond the requirements of their band method books. Adding a few basic exercises into the percussion program will guide students to a more controlled technique.

When various rudiments and rolls, both buzzed and double stroked, are introduced, augment the material in the method book with specific exercises. When rudiments are introduced, focus on them and have students perform them at appropriate, but challenging, tempi.

You’ll find lots of good ideas for additional exercises and tests in books like Ted Reed’s Syncopation, as well as in my Band Teacher’s Percussion Guide, where you’ll also find clear guidelines as to what to watch and listen for when teaching rudiments and other exercises in the high school percussion program.

Remember too that by scheduling short playing tests on a regular basis, you will help your students develop a more consistent practise routine and a more fluid and controlled technique.

Leonard Bernstein: The great conductor, composer and educator would have turned 100 on August 25, 2018.

I’m always disappointed to discover that my percussion students – and that includes high school music students – have so little knowledge of music beyond pop and maybe some classic rock.

I was thinking of this on August 25, the date of what would have been Leonard Bernstein’s centenary. Worldwide celebrations of the event had begun a year earlier.

Bernstein, of course, was a towering musical figure from the 1950s until his death in 1990. Anyone of a certain age will remember him as the dazzling conductor of the New York Philharmonic (1958-69), a composer of music ranging from symphonies, chamber music and ballets to classic Broadway shows such as On the Town and the ground-breaking West Side Story.

He was a brilliant, charismatic communicator and educator. His Young People’s Concerts (this link connects to just one of many episodes available) were aired on CBS throughout the United States and syndicated in over 40 other countries; from 1958-72 he illuminated for millions what to listen for in music and what made great music great.

The world has been commemorating Leonard Bernstein’s centenary for months in the form of lectures, exhibitions, the publication of new biographies and reissue of old ones, reissues of his recorded legacy, and orchestral and chamber ensemble performances of his compositions.

Why then, when I ask senior high school percussion students if they’ve ever heard of Bernstein, do they draw a blank? They don’t have a clue as to who Bernstein was. They are totally unfamiliar with his music – and that includes the brilliant tunes from West Side Story. (The subject usually comes up if they have to play an arrangement of West Side Story in their band class.) Digging a little deeper, I usually discover that they don’t hear a great variety of music – meaning classical or jazz – at home.

We live in an age when high school students only hear a narrow range of pop music broadcast over their chosen radio station. Other than that, they listen solely to music programed on their phone or that they seek out on YouTube. The one opportunity they may have to hear great classical music and jazz, and to discover the important figures associated with those musical genres, is in the junior high and high school band class. That makes it incumbent upon high school and private music teachers to introduce them to the great music and musicians that they are otherwise unlikely to hear, or whose stories they are unlikely to become familiar with, whether it’s Charlie Parker, Beethoven . . . or Leonard Bernstein.

Bernstein’s centenary provided a wonderful opportunity to introduce students to great music, all on YouTube, from the concert hall to Broadway. There are Young People’s Concerts, orchestral performances and even rehearsals (including one with a youth orchestra in which Bernstein tries, in vain, to get a specific sound from the triangle players). And it could all be tied in with the story of a musical genius whose talent, boundless energy and enormous charisma dazzled the world.

But it’s never too late to inspire students by playing great musical works or introducing them to musical genius. If our mission is to broaden their musical horizons, there are ample opportunities, any day of the school the year, to do so.

For further information about Leonard Bernstein’s centenary, look here: https://leonardbernstein.com/at100

What Should a Good Drum Teacher Teach?

When parents invest in their children’s music lessons – on piano, trumpet, violin, oboe or whatever – they expect certain basics to be taught.

A functional technique is one of them. They would also expect a teacher to relentlessly steer students away from bad habits that inhibit technical progress or, even worse, lead to injury.

The child should be taught to read music, and to understand rhythm and the relationship rhythmic values have with one another – and learn to play with rhythmic precision and at an even tempo.

It wouldn’t hurt if the teacher introduced different genres of music – even music from different historical periods – into the mix. And it goes without saying that the teacher will stress musicality throughout every aspect of the learning process.

Parents should expect that their children will be taught to play their instrument well, that their musical curiosity will be piqued, that they will discover the rich rewards to be had by dedicating a reasonable amount of time to thoughtful practising, and that a respect and love of music will be instilled. Many instrumental music teachers, to a greater and lesser degree, teach these things.

Then why do these expectations so frequently evaporate when it comes to drum lessons?

A Lowering of the Drum Teaching Bar

A couple of years ago, a parent came to me with a video of her young son playing drums. He’d been taking lessons and she suspected something might be a bit off. She was right. Clearly, no one had ever told him how to hold the sticks. His arms flailed about. He hammered cymbals and drums with no technique or control. His time was all over the place. He was a thoughtful, conscientious and musical young man (who, I’m delighted to say, is playing very well now) – who had been taught next to nothing through three years of private lessons! Unfortunately, I’ve seen too many students with similar stories to tell. Their lessons, they said, pretty much amounted to hammering out rock beats along with songs.

Just think of the reaction if coaches taught sports the same way. You sign up a child to play basketball, only to discover that kids are allowed to just play around on the court at practises. There’s no warm up, no skill development, no shooting drills, and so on. The child has fun, and lets off some steam, but is it a valuable learning experience? Would any parent find that an acceptable way to teach basketball? Of course not.

Don’t get me wrong. There are lots of good drum teachers out there, but far too many are content to show students a couple of basic rock beats and a simple fill or two – then let them indulge themselves for weeks on end. They don’t teach a functional grip. They don’t teach rolls or rudiments. Reading is largely ignored. Technique is of little consequence. Solid, even timekeeping is an afterthought. Students learn nothing about the great drummers of the past – or present. In fact, they have no clue as to what good drumming is. Any number of issues related to musicality are totally off the radar. The poor drum student is being done a grave disservice. And parents are being ripped off.

How to Choose a Good Drum Teacher: 5 Points to Follow

The search for a music teacher should not be taken lightly. To increase the chances of finding a good drum teacher, one who will provide a child with a solid technical and musical foundation, consider these 5 points.

#1 Get a Recommendation

When it comes to finding a teacher of any instrument, getting a recommendation is a good place to start. And don’t think that, because the student is “just a beginner,” it doesn’t matter how good the teacher is. Finding someone who will set a child off on a solid musical path while instilling joy in learning music is tremendously important. Begin your search by calling a reputable conservatory, school music teacher or neighbour whose child is already taking lessons. And don’t hire the first person you find that will come over to the house for a reasonable price. While you may indeed get lucky and hit upon someone affordable and well qualified, call up a prospective teacher and ask a few questions before taking the next step.

#2 Interview the Prospective Teacher . . . and Ask the Right Questions

Ask the teacher’s background and get a sense of how they teach. Do they place value on developing a solid snare drum technique? Do they balance teaching snare drum technique with drum set technique? Do they teach reading skills? What resources do they use? Do they introduce students to jazz and Latin drumming? After a short interview, you should be left with the impression that they’ve put serious thought into teaching.

#3 Look for Clear Direction

Once you’ve settled on a teacher, remain involved in the teaching process.

Look over entries in notebooks, and what material is assigned. Is the teacher stating clearly what the student should be working on for the week? Have specific exercises and pieces to practise been assigned? Are reminders regarding technique jotted down (“watch that the stick is moving straight up and down” or “remember to drop the stick from a higher level to play accents,” etc.) Along with assigned exercises and pieces, a good drum teacher will provide clear direction as to how to practise them.

#4 Get Feedback from Your Child

You can learn a lot by watching and listening to a child’s playing. Do you see and hear progress? Is the child playing with greater control? Does the music and playing appear more complex as time goes on? It may be more difficult for parents with little musical background to get a sense of all this, but there are times when the answers will be painfully obvious to anyone.

And don’t neglect to have conversations with children about what they are learning. Let them know that you are genuinely interested. Ask what they did during their lesson, what they like about the lessons, what they are learning and discussing during the lessons. Have them demonstrate what they are learning, and what they’ll be working on when they practise that week. If the child is unable to articulate what he/she is doing, or has little sense of what to work on, it’s time to have a chat with the teacher.

#5 Stay Connected with the Teacher

Ask the teacher what the expectations should be. Ask about the practice material. In my studio, together with the student, we often write out a practise schedule that he/she can reasonably follow. It might be only 20 minutes long, but the student will know how much time to spend on a warm up exercise, how long to practise the specific snare drum exercises, and how long to practise an assigned drum set exercise.

And yes – it’s okay for students to play with recordings during lessons. And they should do so at home too.

Drumming with recordings is a great way to develop good timekeeping and listening skills. Working out or approximating the drummer’s fills or timekeeping patterns encourages musical curiosity and creativity. And there’s a lot to be said for just taking time to have some fun playing along with music one likes; playing music is, of course, a joyous experience, and the reason one begins to study an instrument in the first place.

But playing along with recordings should amount to more than just blowing off steam and having fun. When done under the guidance of a good drum teacher, and as a component of a well-considered program, students can enjoy the satisfaction of acquiring real skill on the drum set, and gaining a true sense of pride and achievement.

Used to be that Toronto was known as a jazz town.

Years ago there was the Town Tavern and the Colonial Tavern – clubs that regularly presented the world’s greatest jazz musicians. As a teenager I heard Miles Davis, Thelonious Monk, Stan Getz, Gary Burton, Dizzy Gillespie, Earl Hines, the Modern Jazz Quartet – the list goes on and on – from my balcony seat overlooking the stage. And they came with their whole bands, and stayed for a whole week.

The stage of the Jazz Bistro as seen from the balcony

Jazz Bistro: stage and balcony

Yes, it was another era, but after that there were other clubs, like Bourbon Street and the Montreal Bistro, that would mostly bring in headliners to play with a (terrific) local rhythm section. But the last club to bring in a full band on a semi-regular basis was Top O’ the Senator. It was a sad day when, after 15 years, it closed in 2005.

So in January of this year, when Jazz Bistro opened on the same site as Top O’ the Senator, and with the Senator’s old manager, Sybil Walker, at the helm, it looked like Toronto finally had a club that would aspire to the glory days of the city’s jazz past.

Since opening in January, 2013, Jazz Bistro has brought a number of great musicians to town – not to mention its having served as a prime performance venue for the best in Toronto’s own jazz community.

But this week, from Nov. 14-16, the Jazz Bistro takes another step forward when it presents not only Renee Rosnes – one of the premiere jazz pianists of the day – but her full New York-based quartet. And what a quartet this is. With Ms. Rosnes on piano, Peter Washington on bass, Lewis Nash on drums and Jimmy Greene on saxophone, it happens to be made-up of all-stars. It can’t be easy (read cheap) bringing a band like this to town. Kudos to Jazz Bistro.

For an old guy like me, it brings back memories of afternoons and evenings spent at the Colonial Tavern forty, forty-five years ago. I encourage anyone who loves music to get out to hear this stellar band.

We’ve got the club now. Add an enthusiastic audience and maybe Toronto can once again call itself a jazz town.

The Jazz Bistro www.jazzbistro.com is at 251 Victoria Street in Toronto
For reservations, call 416-363-5299